Welcome to Day 1 of your Flutter development journey! Today, we will set up the Flutter development environment and create your first Flutter app. By the end of this blog, you will have a fully functional development setup and a basic understanding of creating and running a Flutter app. Let's get started!
Installing Flutter SDK:
Flutter is a UI toolkit for building natively compiled applications for mobile, web, and desktop from a single codebase. To start developing with Flutter, you need to install the Flutter SDK.
Steps to Install Flutter SDK:
- Download Flutter SDK:
- Visit the Flutter download page and download the latest stable version for your operating system.
- Extract the SDK:
- Extract the downloaded file to a suitable location on your system.
- Update Environment Variables:
- Add the Flutter SDK path to your system's PATH environment variable.
- Verify Installation:
- Open a terminal and run flutter doctor to check the installation and download any necessary dependencies.
Setting Up the Development Environment:
In addition to the Flutter SDK, you need an IDE with Flutter support. The recommended IDEs are Android Studio, IntelliJ IDEA, or Visual Studio Code.
Installing Android Studio:
- Download and Install Android Studio:
- Visit the Android Studio download page and download the latest version for your operating system.
- Configure Android Studio:
- Follow the setup wizard to configure the IDE and install the necessary SDK components and tools.
- Install Flutter and Dart Plugins:
- Open Android Studio, go to Preferences > Plugins, and search for "Flutter."
- Install the Flutter and Dart plugins and restart Android Studio.
Creating a Flutter Project:
- Create a New Project:
- Open Android Studio and click on "Start a new Flutter project."
- Choose "Flutter Application" and click "Next."
- Configure the Project:
- Enter the project name, description, and save location.
- Ensure the Flutter SDK path is correct and click "Finish" to create the project.
Understanding the Flutter Project Structure:
A Flutter project consists of several directories and files:
- lib: Contains the main Dart code for the application.
- pubspec.yaml: The configuration file for managing dependencies and assets.
- android: Contains the Android-specific code and configuration.
- ios: Contains the iOS-specific code and configuration.
Writing Your First Flutter App:
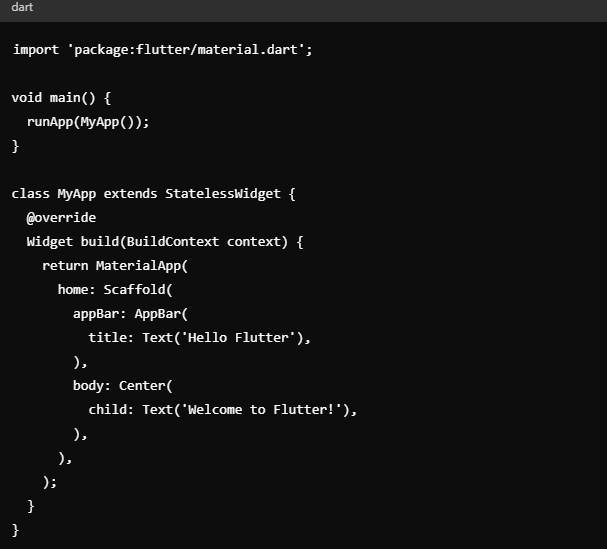
- Open the main.dart File:
- In the lib directory, open the main.dart file. This is the entry point of your Flutter application.
- Replace the Existing Code with the Following:

3. Run the App:
To run your first Flutter app, you need to configure an emulator or connect a physical device.
Configure an Emulator:
- Open AVD Manager: In Android Studio, click on the "AVD Manager" icon in the toolbar.
- Create a Virtual Device: Click on "Create Virtual Device" and follow the prompts to choose a device model and system image.
- Launch the Emulator: Once created, select your virtual device and click the "Play" button to launch the emulator.
Connect a Physical Device:
- Enable Developer Options: On your Android device, go to Settings > About phone and tap "Build number" seven times to enable Developer Options.
- Enable USB Debugging: Go to Settings > Developer options and enable "USB debugging."
- Connect via USB: Connect your device to your computer using a USB cable.
With the emulator running or your device connected, open the terminal and navigate to your project directory. Run the following command to build and run your app:

You should see "Hello Flutter" in the app bar and "Welcome to Flutter!" in the center of the screen.
Understanding Hot Reload:
One of the key features of Flutter is hot reload, which allows you to instantly see the changes you make to your app without restarting it. Simply save your changes, and the updated code will be reflected in the running app within seconds.
Key Takeaways:
- Flutter allows for cross-platform development, enabling you to create apps for multiple platforms from a single codebase.
- Setting up the development environment is crucial for starting development. This includes installing Flutter SDK, configuring an emulator, or connecting a physical device.
- Creating and running your first Flutter app helps you understand the basic structure and workflow of Flutter development.
Congratulations on completing Day 1 of your Flutter development journey! You've successfully set up your development environment and created your first Flutter app. Tomorrow, we will dive deeper into Flutter widgets and explore more advanced features. Happy coding!